Huggy Bears – 1996

This quilt was made for a friend’s new baby.  The bears and hearts on this quilt are machine appliqued using a satin stitch.  The bears’ eyes are hand embroidered since I didn’t want to use buttons on a baby quilt. I machine

quilted this quilt.  Can you believe it!  My first attempt at machine quilting but this quilt needed to get finished quickly.  Now, there’s no fancy free motion quilting.  I just stitched 1/4″ inside each block and around each bear.

Instead of binding this quilt, I decided to frame it with eyelet lace.

Birdhouses – 1995

I loved this bird house pattern.  It kind of had a country look and that’s how I was decorating my house at the time.

The bird houses are pieced and there are hand appliqued birds – 3 of them but one is hard to see.  The checkerboard border is pieced because I couldn’t find a large checked fabric that would work.  I hand quilted around each bird house, then did a clam shell pattern in the background.  I quilted an X through each of the lighter squares in the border.

Sunbonnet Sue – 1992

I wanted to make a special quilt for a friend’s new baby, a little girl, and Sunbonnet Sue seemed to be the best choice.  I started this quilt in September 1991 and finished it in June 1992.

Each Sue is dressed in a different fabric and there’s a bit of lace either at the bottom of the apron or dress.  This quilt is hand appliqued, machine pieced and hand quilted.  I quilted a cross hatch pattern within each block and

hearts with lines in the sashings and borders.  There’s a darker square with a white heart appliqued in it in each corner and where the sashings meet in the quilt.   For this quilt, I followed a pattern in “Sunbonnet Sue’s Neighborhood” by Oxmoor House.

Pink Star – 1991

This wall hanging is the result of a class I took showing a simplified method of piecing a lone star quilt.  This wall hanging is 46″ square.

It is machine pieced and hand quilted.  I spent a lot of time trying to decide on the best background fabric because, for some reason, I didn’t want to use the darker green, but it was the only fabric that worked.

Sample The Stars – 1990

This is a queen size sampler quilt that I started in 1988 and finished in 1990.

It is machine pieced and hand quilted.  Here is the feather wreath I quilted around the small stars that were used to join the sashing.

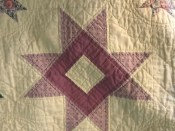
This quilt started out as all Ohio Stars done in a variety of matching fabrics. But it wasn’t long before I got bored piecing the same star design.

I don’t know where the bright idea came from, but I decided to piece a different quilt block design in the center of each star.  Here are some of them.


Each block had to be drafted down from its 12″ size to a little over 5″.  Some were easier to do than others, such as the braced star (#1) and the pin wheel (#2) above, since you could easily make them fit into any square space.


Others required a bit of drafting and math and the use of graph paper.  I could probably put my fingers on the formula I used to do this if I had to.  This was in 1988.  Nowadays, you can simply use Electric Quilt.


Basically you can redraft any size block to a different size, larger or smaller, drawing it out on graph paper, and then using each piece drawn on the graph paper to cut out your block pieces which would then be sewn together.

Rose Applique Pillows – 1989

Each Christmas I’m faced with what to give to whom as a gift.  Since I’m a crafter and a quilter, my next thought is what can I make.  These pillows are the result of that kind of thinking – even though it’s SO much easier to buy a gift.

The pillows were made as gifts for 2 friends and a sister.  They were made using traditional rose applique designs.   Each is hand appliqued and hand quilted


Oriental Springtime – 1989

Here’s another quilted finish for a cross stitched design.  It needed something more to enhance the design, so I drew a flower to applique in each corner that was similar to the flower in the cross stitched piece.

The quilt top was machine pieced and the flowers were hand appliqued to each corner.  It was hand quilted in a cross hatch pattern and finished as a wall hanging.

Spring Basket – 1989

I took a class that taught applique, cording and trapunto.  The pattern was this basket design.  I loved the way the appliqued handles seem to twist around each other.

We appliqued and pieced the pillow top and then lightly traced the flower and leaf design inside the basket.  A piece of fabric large enough to cover the flowers and leaves with extra to spare was inserted behind the flowers and basted down.  We stitched the entire design as if we were quilting it.  Then we made a slit and stuffed a small amount of fiberfill in each section of the flowers – not too much or they will appear overfilled (trapunto) and the slits were gently stitched closed.  Next, using regular yarn and a large eye needle, we filled the channels of the leaves by inserting he needle in the back fabric, but not through the front, ran it along the channel and out again through the back being careful not to pull too tightly (cording).  We trimmed the yarn close to where it went into and out of the back fabric.

I layered (backing, batting and top) and hand quilted this basket 1/4″ inside each quilt patch and outside the basket.  I quilted a little closer to the appliqued basket handle.  I love fancy quilting designs and chose one to quilt in each corner.

I finished this quilt as a pillow.  I decided to make a piped edge but used a large cord and ruched the fabric around it so it has a gathered look.

This is a good example of the benefits of taking quilt classes.  I learned techniques in this class that I would not have figured out on my own.

Making Do -1988

This pattern is a Marquis Cross variation.  I found it in a book called “Scrap Quilts” by Judy Martin.  This book has a lot of nice, traditional scrap quilts that are timeless.

I hand and machine pieced this quilt.  I enjoyed hand work then and still do.  It is hand quilted in the ditch around the piecing and a tulip is quilted in each of the solid squares.

This is a good size lap quilt that measures 51″ by 74″.  I named it “Making Do” because it was made primarily from scraps I was accumulating from previous projects.


Many Mini Hearts – 1988 and 1989

I took an applique class which involved appliqueing small hearts to a background. We divided the background into 36 even squares and lightly marked them.  Then we thread basted each heart to the background and hand appliqued them down.

I don’t think we quilted around each heart but hand quilted the straight lines between the hearts.  I gave this wall hanging to my sister and enjoyed doing it so much that I made another one.  I gave this one to a friend.

I hand quilted a design in each border.  You can see it better in the second quilt – it’s a curved design with a heart on the inside of each curve.